Git & GitHub
Git is the industry-standard version control system for tracking changes to your code. GitHub is the cloud hosting service that teams use to collaborate, review, and deploy projects built with Git.
Git vs GitHub
Git    → version control system that runs locally on your machine
          tracks changes, manages history, handles branching

GitHub → cloud hosting service for Git repositories
          collaboration, pull requests, code review, deployment

Git is the tool. GitHub is the service.
Basic Git Workflow
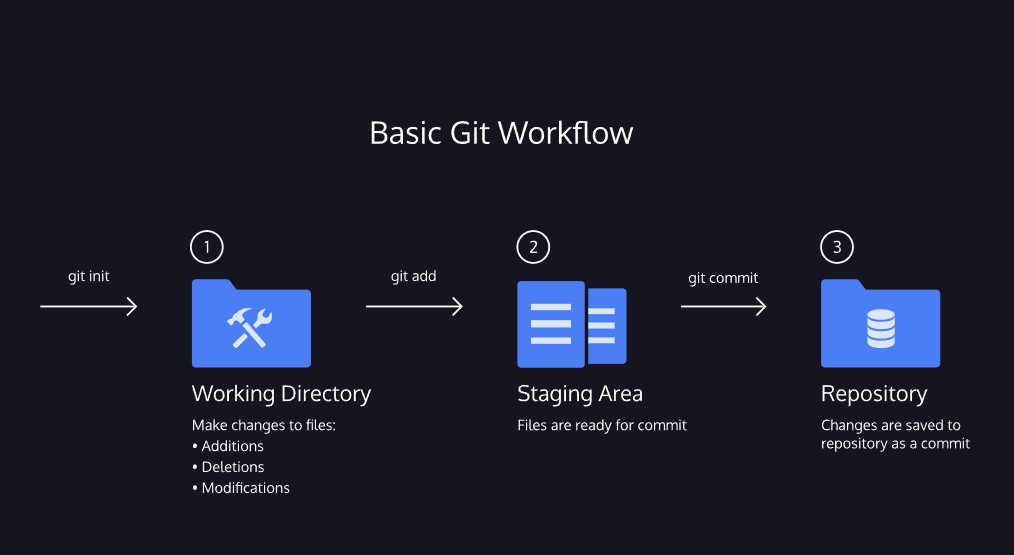
git init        → creates a new Git repository in the current folder
git status      → inspects the working directory and staging area
                   shows untracked files AND changes staged for commit
git add         → moves files from the working directory to the staging area
                   git add filename  → stage a single file
                   git add .         → stage all files
git diff        → shows the difference between the working directory and the staging area
git commit      → permanently stores file changes from the staging area in the repository
git log         → shows a list of all previous commits
The three areas:

Working Directory  → where you make changes (additions, deletions, modifications)
Staging Area       → files ready to be committed  (git add moves them here)
Repository         → permanent record of commits   (git commit saves them here)
.gitignore & node_modules
The mistake: ran npm install, then git add . before adding node_modules
to .gitignore. Every package in node_modules got staged into the commit.

Why this matters: node_modules can be huge (thousands of files) and is
fully reproducible from package.json + package-lock.json via npm install —
it should never be committed.
Fixing it — unstage node_modules after a bad git add .:

git rm -r --cached node_modules   → removes node_modules from the staging
                                     area and from future tracking, but
                                     LEAVES the files on disk untouched
                                     (--cached = staging/index only)

Then add it to .gitignore so it can't happen again:

echo "node_modules/" >> .gitignore
Watch out — Future Alan's gotcha:

Most projects are covered by a GLOBAL .gitignore (set once for all repos),
but global ignores don't always carry over to every new project setup —
e.g. a fresh repo created outside the usual workflow. Always check that
node_modules/ is actually ignored (git status right after npm install)
before the first git add . on a new project.
Backtracking in Git
git show HEAD → shows the commit you are currently on
includes the commit message and all file changes
git checkout HEAD filename → discards changes in the working directory
restores the file to its last committed state
(older syntax — git restore is the modern equivalent)
git reset HEAD filename → removes a file from the staging area
changes stay in the working directory
(older syntax — git restore --staged is the modern equivalent)
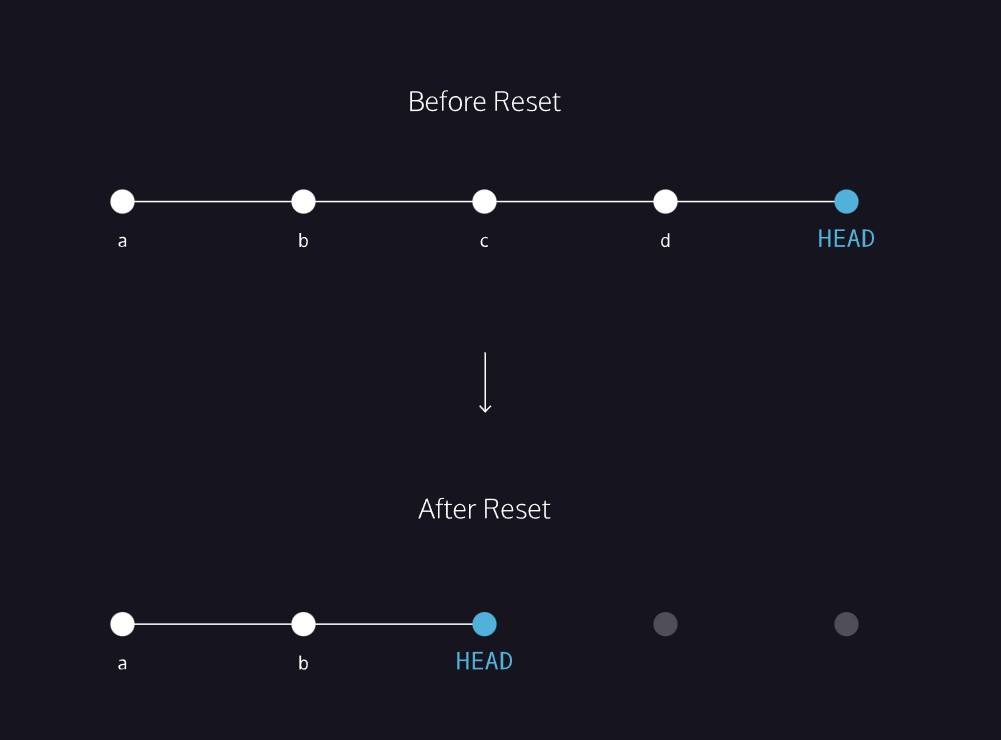
git reset commit_SHA → resets back to a previous commit
commits after that SHA become inaccessible
HEAD moves to that earlier commit
git restore filename           → discards changes in the working directory
                                  restores the file to its last committed state
                                  (modern replacement for git checkout HEAD filename)

git restore --staged filename  → removes a file from the staging area
                                  changes stay in the working directory
                                  (modern replacement for git reset HEAD filename)

git revert commit_SHA          → creates a NEW commit that undoes a previous commit
                                  does not rewrite history — safe to use on commits
                                  that have already been pushed and shared

revert vs restore:
  git restore  → undoes changes in your working directory or staging area (not committed yet)
  git revert   → undoes a commit that has already been made, by adding a new commit
Staging multiple files in one command:

git add filename_1 filename_2
Git Stash
Use when: you need to switch branches but aren't ready to commit your current work.
Git stash saves your changes temporarily so you can come back to them later.

$ git stash      → stashes your uncommitted changes and returns to a clean state
$ git stash pop  → retrieves your stashed changes back into the working directory
Typical flow:

1. You're working on experimental code on a new branch
2. You need to fix something on another branch but aren't ready to commit
3. git stash        → work is saved, working directory is clean
4. Switch branch, make the fix, commit it
5. Switch back to your branch
6. git stash pop    → your work is restored, carry on
Git Log — Advanced
git log                        → full commit history of the current branch

git log --oneline              → commit history in one line per commit format

git log -S "keyword"           → commits where the number of occurrences of
                                  the keyword changes in at least one file
                                  (additions, deletions, or modifications)

git log --oneline --graph      → visual representation of branches and commits
                                  combined with --oneline to keep it concise

git branch -a                  → lists all branches, local and remote
                                  see full docs: https://git-scm.com/docs/git-branch
Git Commit Amend
Use when: you've just committed but need to fix a small mistake without
creating a whole new commit.

git add filename                   → stage your fix first
git commit --amend                 → updates the previous commit
                                      opens your editor to update the commit message

git commit --amend --no-edit       → updates the previous commit
                                      keeps the existing commit message
Note: --amend replaces the entire previous commit with a new one.
Avoid using it on commits that have already been pushed and shared.
Git Aliases
Aliases let you create shortcuts for long or frequently used Git commands.

$ git config --global alias.co "checkout"
$ git config --global alias.br "branch"
$ git config --global alias.glop "log --pretty=format:'%h %s' --graph"

Once set, you can use the shortcut instead of the full command:

$ git co example_branch     → runs: git checkout example_branch
$ git br                    → runs: git branch
$ git glop                  → runs: git log --pretty=format:'%h %s' --graph
GitHub Flow
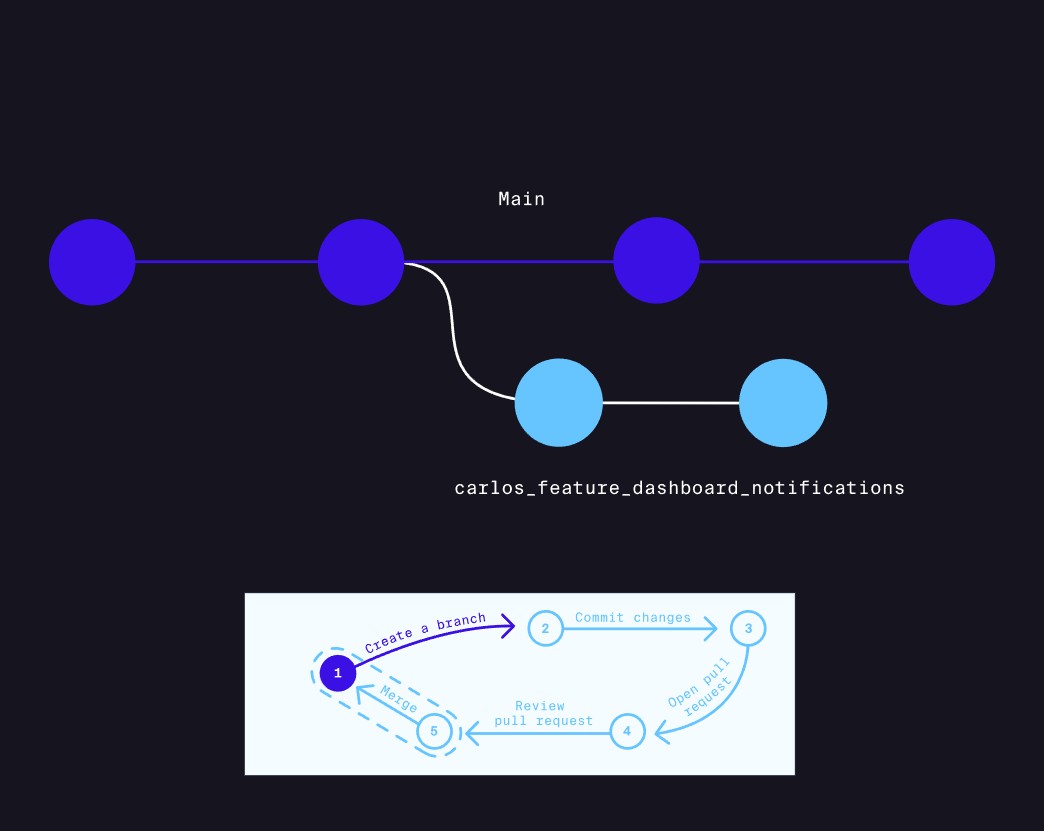
1. Create a branch    → isolate your work from main
2. Commit changes     → record your progress on the branch
3. Open pull request  → propose merging your branch into main
4. Review             → team reviews, discusses, and gives feedback
5. Merge and delete   → approved branch merges into main, branch is deleted
Branch Commands
git branch                   → list all local branches
git branch branch-name       → create a new branch
git checkout branch-name     → switch to an existing branch
git checkout -b branch-name  → create and switch to a new branch in one step
git branch -d branch-name    → delete a branch (safe — only works if merged)
git branch -a                → list all branches, local and remote
Branch naming — use a descriptive name that includes author, type, description:

carlos_feature_dashboard_notifications
author_type_short-description

Each team will adopt their own conventions.
Forking
A fork is a copy of someone else's repository saved to your own GitHub account.

Use when: you want to contribute to a project you don't have write access to,
such as an open source project.

Forking is done through the GitHub UI — there is no git fork command.
Fork vs Branch:

Branch  → works within the same repository
            used when you have write access to the project

Fork    → creates a separate copy of the repo on your GitHub account
            used when contributing to someone else's project
Typical forking flow:

1. Fork the repository on GitHub (creates your own copy)
2. Clone your fork locally        → git clone url
3. Create a branch                → git checkout -b branch-name
4. Make changes and commit        → git add . / git commit -m "message"
5. Push to your fork              → git push
6. Open a pull request            → from your fork back to the original repo
7. Discuss and review
8. Maintainer merges your PR
Pull Requests
A pull request (PR) is a proposal to merge your branch into main.
It opens a discussion page where teammates can review and give feedback
before the code is merged into the official project.

Best practices when creating a PR:
- write a clear, detailed description of what changed and why
- add screenshots or notes to help the reviewer
- make sure the code is working before submitting
- keep PRs small — large PRs are slow and hard to review
Code Review
Best practices when reviewing a PR:
- explain WHY something should change, not just what
- be precise — point to the specific line or block
- provide resources or examples to support your feedback
- think about the bigger picture — would this scale?
- use "Resolve conversation" once feedback has been addressed
Merge and Delete Branch
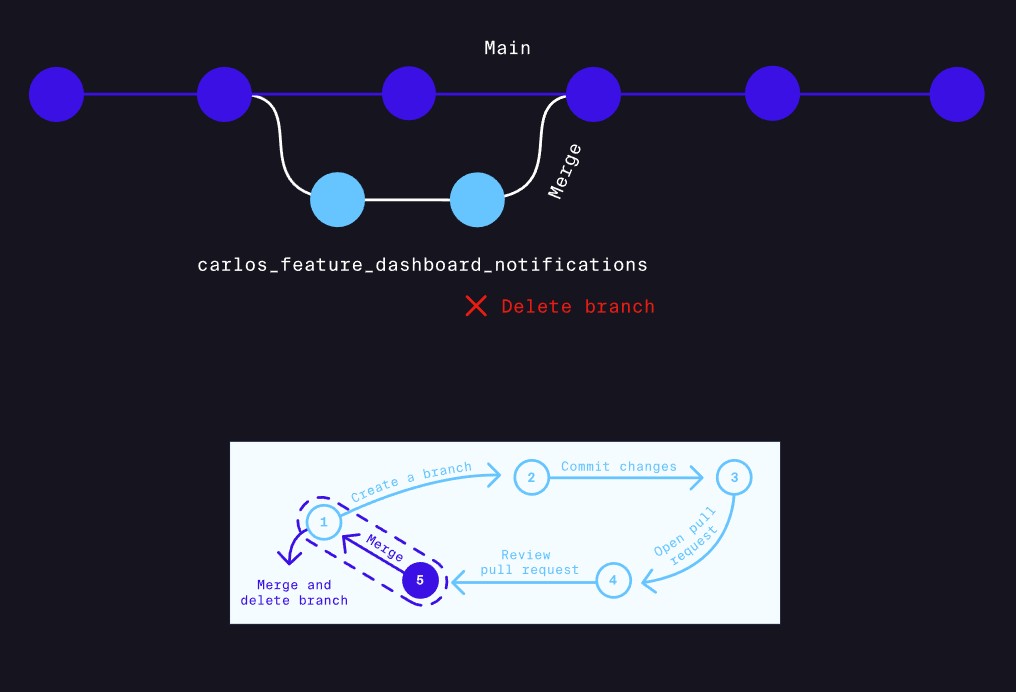
Once a PR is approved:
→ merge the branch into main
→ delete the branch to keep the repo tidy
→ only keep active branches open

git branch -d branch-name    → deletes the branch locally after merging
Markdown
Markdown is a lightweight syntax for styling plain text so it can be
converted to HTML. GitHub renders Markdown automatically — which is why
your README.md displays as a formatted page on your repository.

File extensions: .md or .markdown
Headings:

# H1 heading           → <h1>
## H2 heading          → <h2>
### H3 heading         → <h3>
#### H4 heading        → <h4>
##### H5 heading       → <h5>
###### H6 heading      → <h6>

Alternative heading style:
My Title               → <h1>
========
My Subtitle            → <h2>
--------
Emphasis:

**bold text**          → <strong>
*italic text*          → <em>
Lists:

Numbered:              Bulleted (pick one marker and stick to it):
1. Item one            * Item
2. Item two            - Item
3. Item three          + Item
Blockquotes:

> This is a quote
> that spans two lines

renders as an indented block, equivalent to <blockquote>
Common use cases as a developer:

README.md       → displayed on your GitHub repo front page
PR descriptions → supports Markdown formatting in GitHub
Documentation   → most doc tools (MkDocs, Docusaurus) use Markdown